Showing posts with label Window Application. Show all posts

ShortCut Keys(F1,F2...F12) Press (Keyboard) Open New Window Form in C# Window Application

Shortcut Key Press Open New Window Form 

Press ShortCut(Function Key) Like (F1,F2...F12) Open New Window Form or Existing Window Forms Using C# Window Application.

                                          DEMO


                                  C# CODING


using System;
using System.Collections.Generic;
using System.ComponentModel;
using System.Data;
using System.Drawing;
using System.Linq;
using System.Text;
using System.Threading.Tasks;
using System.Windows.Forms;

namespace WindowsFormsApplication2
{
    public partial class FunctionKey : Form
    {
        public FunctionKey()
        {
            InitializeComponent();
        }
        private void FunctionKey_Load(object sender, EventArgs e)
        {
            this.KeyUp += new System.Windows.Forms.KeyEventHandler(KeyEvent);
        }
        private void KeyEvent(object sender, KeyEventArgs e) //Keyup Event 
        {
            if (e.KeyCode == Keys.F1)
            {
                Email ee = new Email();
                ee.Show();
            }
            if (e.KeyCode == Keys.F2)
            {
                Logee ll = new Logee();
                ll.Show();
            }
            if (e.KeyCode == Keys.F3)
            {
                Login li = new Login();
                li.Show();
            }
            else if (e.KeyCode == Keys.F4)
            {
                MessageBox.Show("This is Empty");
            }

        }
    }

}


First - Add New Window Form - For Using Function 

Key Event


Next - Add KeyEvent - Function Key(F1,F2,F3.....) Click Assign Form Name


Next - Run[F5] - Function Key Click Open Window 


Forms

How To Use C# TabControl in Window Application


C# TabControl


The TabControl manages tab pages where each page
may host different child controls.
The .NET Framework provides this versatile and easy-to-use control. We add the control, change its pages, manipulate it in C# code, and change its visual settings.


TabPages. 

Adjusting the TabPages in the TabControl is important. This mechanism allows you to add a variable number of pages to your tab control.


                                        DEMO


Video


C# CODING

using System;
using System.Collections.Generic;
using System.ComponentModel;
using System.Data;
using System.Drawing;
using System.Linq;
using System.Text;
using System.Threading.Tasks;
using System.Windows.Forms;

namespace WindowsFormsApplication2
{
    public partial class TabControl : Form
    {
        public TabControl()
        {
            InitializeComponent();
        }

        private void button1_Click(object sender, EventArgs e)
        {
            tabControl1.SelectTab("tabPage2");
         
                        // OR
            tabControl1.SelectedIndex = 1;

            tabPage2.BackColor = Color.Green;
        }

        private void button2_Click(object sender, EventArgs e)
        {
            tabControl1.SelectTab("tabPage3");

            //    OR

            tabControl1.SelectedIndex = 2;
            tabPage3.BackColor = Color.Red;

        }

        private void button3_Click(object sender, EventArgs e)
        {
            tabControl1.SelectTab("tabPage1");

            //    OR

            tabControl1.SelectedIndex = 0;

            tabPage1.BackColor = Color.Pink;


        }
    }
}


First - Add New - Window Form - Add TabControl  From ToolBox


Next -  Click - Add Tab -  New TabPage  Added


Next- Property(F4) - Click - TabPages - Show - All Tab Pages - OK.


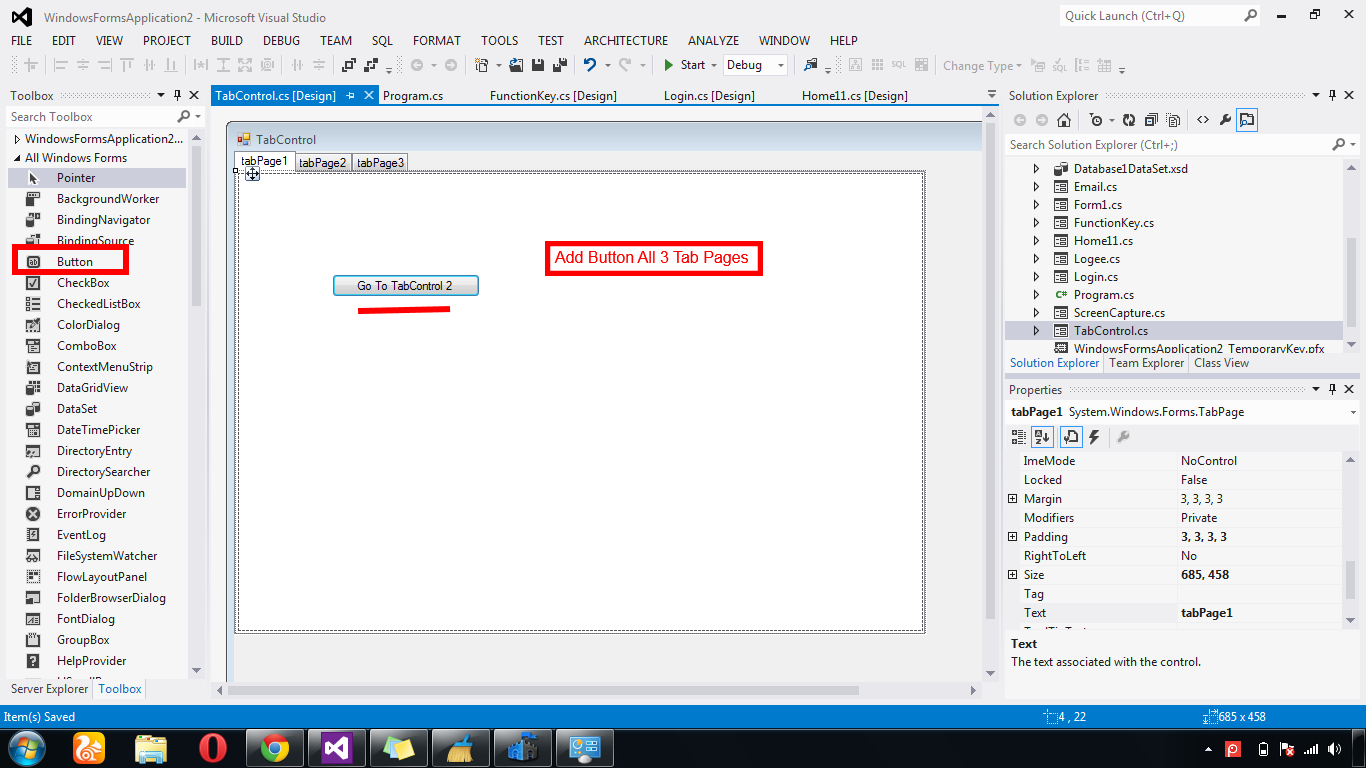
Next - Add Button  Control  For Every Pages.


Every - Button - Call Next TabPages & Color Changes


Next - Run [F5] - Show TabPages


Setup File Create Window Application in C# Visual Studio 2012

Setup File Create Window Application


Window Application  After Complete Software Create Setup File Window Application in C#.

Steps:

First Create Window Application - After Finished Software - Click Build.


Next - Click - Build Solution


Next - Build - Publish WindowApplication2(Your Project Title)


Next - Browse Location To Create Setup File - Click Next Button.


Next - From a CD ROM or DVD ROM RadioButton Click - Next Button Click 


Next - Choose Required Option - Click Next Button


Next - Selected Path Location Publish Setup File - Click Finish Button


Next - Open The Publish Path Created Setup File


Function Key(F1,F2...F12) Press (Keyboard) Open New Window Form in C# Window Application

Function Key Press Open New Window Form 

Press Function Key Like (F1,F2...F12) Open New Window Form or Existing Window Forms Using C# Window Application.

                                          DEMO


                                  C# CODING


using System;
using System.Collections.Generic;
using System.ComponentModel;
using System.Data;
using System.Drawing;
using System.Linq;
using System.Text;
using System.Threading.Tasks;
using System.Windows.Forms;

namespace WindowsFormsApplication2
{
    public partial class FunctionKey : Form
    {
        public FunctionKey()
        {
            InitializeComponent();
        }
        private void FunctionKey_Load(object sender, EventArgs e)
        {
            this.KeyUp += new System.Windows.Forms.KeyEventHandler(KeyEvent);
        }
        private void KeyEvent(object sender, KeyEventArgs e) //Keyup Event
        {
            if (e.KeyCode == Keys.F1)
            {
                Email ee = new Email();
                ee.Show();
            }
            if (e.KeyCode == Keys.F2)
            {
                Logee ll = new Logee();
                ll.Show();
            }
            if (e.KeyCode == Keys.F3)
            {
                Login li = new Login();
                li.Show();
            }
            else if (e.KeyCode == Keys.F4)
            {
                MessageBox.Show("This is Empty");
            }

        }
    }

}


First - Add New Window Form - For Using Function 

Key Event


Next - Add KeyEvent - Function Key(F1,F2,F3.....) Click Assign Form Name


Next - Run[F5] - Function Key Click Open Window 

Forms

Validation For DataGridview Values Before Insert To DataBase(Avoid Null Values) Using C# Window Application

Validation For DataGridview Values Before Insert To  DataBase

DataGridview Add Directly To RunTime  Validation Null Values Avoid To Insert  DataBase Using C# Window Applicatio.

                                         DEMO


                                    C# CODING

using System;
using System.Collections.Generic;
using System.ComponentModel;
using System.Data;
using System.Drawing;
using System.Linq;
using System.Text;
using System.Threading.Tasks;
using System.Windows.Forms;
using System.Data.SqlClient;

namespace WindowsFormsApplication2
{
    public partial class Home11 : Form
    {
        public Home11()
        {
          
            InitializeComponent();
        }

        private void Home11_Load(object sender, EventArgs e)
        {
           
        }      

        private void dataGridView1_RowValidating(object sender, DataGridViewCellCancelEventArgs e)
        {
            if ((dataGridView1[0, e.RowIndex].Value == null) || (dataGridView1[1, e.RowIndex].Value == null))
            {
                // e.Cancel = true;
                MessageBox.Show("Fill Empty Row");

            }
        }

        private void button1_Click(object sender, EventArgs e)
        {
            if (dataGridView1.Rows.Count>1)
            {
                // Your Insert Command

                MessageBox.Show("Data Saved");
           
            }
        }
          
    }
}


Next - Add New Window Form - Select DataGridView - EditColumn - Add Field Name & Header Text


Next - Created DataGridView Column 


Next - DataGridview - Event - Select RowValidating Click 


Next - Add  DataGridView Validating Null Values 


Next - Run [F5]  The Program - Validation for DataGridView


Remove or Delete DataGridView Selected Row Button Click Using in C# Window application

Remove or Delete DataGridView Selected Row

DataGridview Selected Row Remove or Delete Button Click Event in C# Window Application.

                                         DEMO


     C# CODING


using System;
using System.Collections.Generic;
using System.ComponentModel;
using System.Data;
using System.Drawing;
using System.Linq;
using System.Text;
using System.Threading.Tasks;
using System.Windows.Forms;
using System.Data.SqlClient;

namespace WindowsFormsApplication2
{
    public partial class Home11 : Form
    {
        public Home11()
        {
          
            InitializeComponent();
        }

        private void Home11_Load(object sender, EventArgs e)
        {
            SqlConnection con = new SqlConnection(@"Data Source=(LocalDB)\v11.0;AttachDbFilename=C:\Users\Drizzles\Documents\Visual Studio 2012\WindowsFormsApplication2\WindowsFormsApplication2\Database1.mdf;Integrated Security=True");
            con.Open();

            SqlCommand cmd = new SqlCommand("select * from country", con);
            SqlDataAdapter adp = new SqlDataAdapter(cmd);
            DataTable dt = new DataTable();
            adp.Fill(dt);
            SqlDataReader rd = cmd.ExecuteReader();
            if (rd.Read())
            {
                dataGridView1.DataSource = dt;
            }
          }

        private void button1_Click(object sender, EventArgs e)
        {
            if (dataGridView1.Rows.Count>1)
            {
                if (dataGridView1.Rows[dataGridView1.CurrentRow.Index].IsNewRow != true)
                {
                    dataGridView1.Rows.Remove(dataGridView1.CurrentRow);
                }
            }
            else {

                MessageBox.Show("No Record(s) Found");           
            }
        }      
    }
}


First - Add New Window Form - Select DataGridview From ToolBox


Next - DataGridview Bind Database Fields   & Button Click Event - Selected Row Delete Coding For DataGridView


Run[F5] - Remove Selected Row Values