Showing posts with label Timer. Show all posts

Automatically Take Snap Shots Store in SQL DataBase Table Using WindowApplication C#

Automatically Take Snap Shots Store in SQL DataBase Table 

Automatically Take a Snap Shots  Store In Database Table as Well as Pc  Path Laocation Using Window Application C#.


http://dotnetdrizzles.blogspot.in/2015/04/automatically-take-snap-shots-capturing.html

http://dotnetdrizzles.blogspot.in/2015/04/capture-screen-shot-automatically-using.html


                                  DEMO


                             C# CODING


using System;
using System.Collections.Generic;
using System.ComponentModel;
using System.Data;
using System.Drawing;
using System.Linq;
using System.Text;
using System.Threading.Tasks;
using System.Windows.Forms;
using System.Data.SqlClient;

namespace WindowsFormsApplication2
{
    public partial class ScreenCapture : Form
    {
        public ScreenCapture()
        {
            InitializeComponent();
        }

        private void ScreenCapture_Load(object sender, EventArgs e)
        {
            Timer timer = new Timer();
            timer.Interval = (1 * 10000); // 10 secs
            timer.Tick += new EventHandler(ScreenCapture_Load);
            timer.Start();
                      
            Bitmap bmp = new Bitmap(Screen.PrimaryScreen.Bounds.Width, Screen.PrimaryScreen.Bounds.Height);
            using (Graphics g = Graphics.FromImage(bmp))
            {

                g.CopyFromScreen(0, 0, 0, 0, Screen.PrimaryScreen.Bounds.Size);

                bmp.Save(@"E:\New folder (2)\image.jpg");

                pictureBox1.Image = bmp;


                string date1 = DateTime.Now.Hour.ToString() + "_" + DateTime.Now.Minute.ToString() + "_" + DateTime.Now.Second.ToString() + "_" + DateTime.Now.Millisecond.ToString();
                string picname = "src";
                string path = Application.StartupPath.Substring(0, Application.StartupPath.LastIndexOf("bin"));
                Bitmap imgImage = new Bitmap(pictureBox1.Image);
        imgImage.Save(path + "\\file\\" + picname + "_" + date1 + ".jpg");

                SqlConnection  con = new SqlConnection(@"Data Source=(LocalDB)\v11.0;AttachDbFilename=C:\Users\drizzle\Documents\Visual Studio 2012\WindowsFormsApplication2\WindowsFormsApplication2\Database1.mdf;Integrated Security=True");
                con.Open();
          SqlCommand cmd1 = new SqlCommand
            ("insert  into capture(imagename,imagepath)values('" + picname + "_" + date1 + "','" + "file/" + picname + "_" + date1 + "')", con);
                cmd1.ExecuteNonQuery();


            }
        }
    }
}


First - Add New Window Form - DataBase Table Fields Create 


Next - Add - Picture Box - From ToolBox -Add Folder To Solution Explorer


Next - Insert DataBase Fileds - Add Capturing Image To file   Folder - Save 


Next - Run[F5] - Automatically Capture Snap Shots - Show Picture box


Show Capturing Images - bin - File - Images


Next - Show The DataBase Table


Automatically Take Snap Shots Capturing Interval Using Bitmap in Window Application or Web Application C#

Automatically Take Snap Shots Capturing

Automatically Take A Screen Capture Particular Interval Time Save To Date Time as  Name Using Window Application.

                              
                                 DEMO


                                  Download Coding
                                        
                                                         Download

                                     C# CODING


using System;
using System.Collections.Generic;
using System.Linq;
using System.Web;
using System.Web.UI;
using System.Web.UI.WebControls;
using System.Windows.Forms;
using System.Drawing;
using System.Drawing.Imaging;

public partial class ScreeeCapturen : System.Web.UI.Page
{
    protected void Page_Load(object sender, EventArgs e)
    {
        string a = DateTime.Now.Day.ToString();
        string b = DateTime.Now.Month.ToString();
        string c = DateTime.Now.Year.ToString();

        string d = DateTime.Now.Hour.ToString();
        string f = DateTime.Now.Minute.ToString();
        string g = DateTime.Now.Second.ToString() + ".00";

 string e1 = "Date=" + a + "-" + b + "-" + c + "&&Time=" + d + "." + f + "." + g;

        Bitmap bitmap = new Bitmap(Screen.PrimaryScreen.Bounds.Width, Screen.PrimaryScreen.Bounds.Height);

        Graphics graphics = Graphics.FromImage(bitmap as System.Drawing.Image);

        graphics.CopyFromScreen(25, 25, 25, 25, bitmap.Size);

        bitmap.Save(@"D:\Capturing\"+e1+".png", ImageFormat.Bmp);

       // bitmap.Save(@"D:\Capturing\" + e1 + ".png", ImageFormat.Bmp);

       // bitmap.Save(@"D:\Capturing\" + e1 + ".jpg", ImageFormat.Bmp);

       // bitmap.Save(@"D:\Capturing\" + e1 + ".bmp", ImageFormat.Bmp);

    }

}


First - Add New Form - Add NameSpaces - Call Windows Activity


Next - Add Reference - Right Click - Project Name - Add Reference Click


Next - FrameWork - System.Windows.Forums   - OK


Image Save To DataTime Name  - Particular folder


Next - Add Timer - Set Interval - Add - Script Manager 


Next - Run[F5]  - Particular Interval Take Snap Shots


Progress Bar Open Login Button Click in C# Window Application

Progress Bar Open Login Button Click


Progress Bar Open WhenEver Click Button Load  The Progress Bar Particular Interval After go To Next Form Using C# Window Application.

                           DEMO 


                             C# CODING


using System;
using System.Collections.Generic;
using System.ComponentModel;
using System.Data;
using System.Drawing;
using System.Linq;
using System.Text;
using System.Threading.Tasks;
using System.Windows.Forms;


namespace WindowsFormsApplication2
{
    public partial class Login : Form
    {
        public Login()
        {
            InitializeComponent();
           
        }
       

        private void button1_Click(object sender, EventArgs e)
        {
            if (textBox1.Text == "A" && textBox2.Text == "A")
            {
                progressBar1.Visible = true;

                timer1.Enabled = true;
            }
        }

        private void timer1_Tick(object sender, EventArgs e)
        {
            progressBar1.PerformStep();

            if (Convert.ToInt32(progressBar1.Value) == 100)
            {
               timer1.Enabled = false;

               Home h = new Home();
               h.Show();
            }
        }
        private void Login_Load(object sender, EventArgs e)
        {
            Login frm = new Login();
            frm.FormBorderStyle = FormBorderStyle.FixedDialog;
            frm.StartPosition = FormStartPosition.CenterScreen;
            progressBar1.Visible = false;

        }         
                                
    }
}


First Add The New Form - Select Labels & Textbox & Progress Bar & timer From ToolBox


Next - Set - Progress Bar Property


Next - Set  To Timer Control Enable & Open the Progress Bar


Next -  Run[F5] - Login Form Open


Next - Login Button Click  - Progress Bar Loading


Generate Random Numbers in Asp.Net C#

Generate Random Numbers

Generate Random Numbers  in Add the Minimum & Maximum Range Control to Refresh  Ajax Timer & Script Manager in Asp.Net C#.


                            Download Coding
                                    
                                              Download

                         DEMO


SYNTAX


random.Next(int Minimum ,int Maximum)


Html Coding

<html xmlns="http://www.w3.org/1999/xhtml">
<head runat="server">
    <title></title>
</head>
<body>
    <form id="form1" runat="server">
    <div>
        <br />
        <asp:Label ID="lblRandom1" runat="server" ForeColor="#CC3300"></asp:Label>
        <br />
        <asp:Label ID="lblRandom2" runat="server" ForeColor="#CC66FF"></asp:Label>
        <br />
        <asp:Label ID="lblRandom3" runat="server" ForeColor="#CC3300"></asp:Label>
        <br />
        <asp:Label ID="lblRandom4" runat="server" ForeColor="#CC66FF"></asp:Label>
        <br />
        <asp:Label ID="lblRandom5" runat="server" ForeColor="#CC3300"></asp:Label>
        <br />
        <br />
        <asp:ScriptManager ID="ScriptManager1" runat="server">
        </asp:ScriptManager>
        <br />
        <asp:Timer ID="Timer1" runat="server" Interval="3000">
        </asp:Timer>
        <br />
        </div>
    </form>
</body>
</html>


C# Coding

using System;
using System.Collections.Generic;
using System.Linq;
using System.Web;
using System.Web.UI;
using System.Web.UI.WebControls;

public partial class Randoms : System.Web.UI.Page
{
    protected void Page_Load(object sender, EventArgs e)
    {
            
        //  rm.Next(Minimum Number,Maximun Number)

        Random rm = new Random();

        lblRandom1.Text = "1st Number="  +   rm.Next(1, 10).ToString();
        lblRandom2.Text = "2nd Number=" + rm.Next(1, 10).ToString();
        lblRandom3.Text = "3rd Number=" + rm.Next(1, 10).ToString();
        lblRandom4.Text = "4th Number=" + rm.Next(1, 10).ToString();
        lblRandom5.Text = "5th Number=" + rm.Next(1, 10).ToString();


    }
  
}


First Create the New WebForm - Add the Labels & Ajax Timer & Script Manager


Next - AJAX Timer Set the Interval Time =3000 (3 Seconds)


Next - Code Behind  Page_Load  - Add the Random Minimum & Maximum Range.


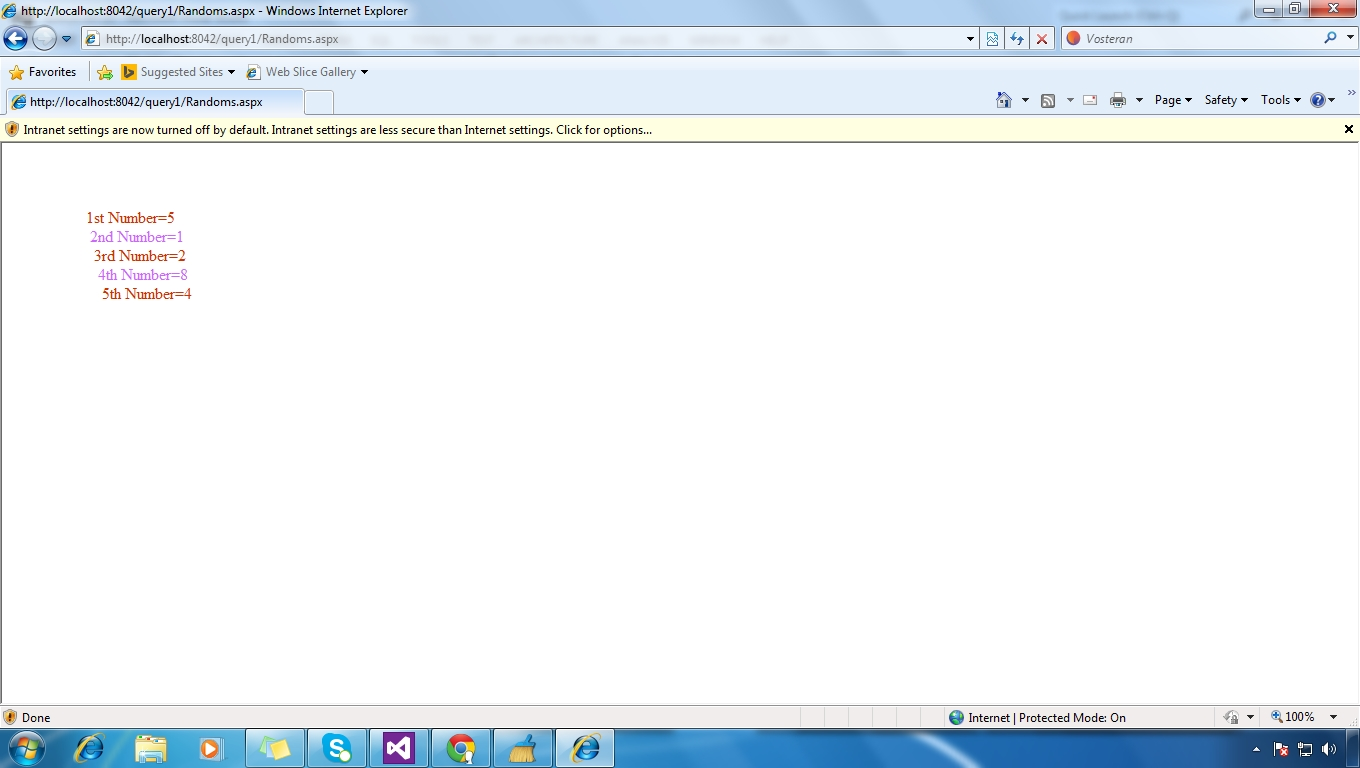
OUTPUT


Next - Run[F5] The Program - Get the Random Numbers