IMAGE UPLOAD & BIND GRIDVIEW
Image Upload And Bind The Gridview After Inserted Images Using Asp.Net C#.
Multiple Image Upload
Image Update in Gridview
Show Image Preview
Restrict Upload File Size
Image Insert Bind GridView
Without Database Upload Image Show
DEMO

HTML Coding
C# Coding
Image Upload & insert
NameSpace
Gridview Bind All Table Values (Select query)
First - Select New WebForm - Add file Upload Tool From Toolbox & Label & Textboxes - Change the Textbox Id name

Next - Create Table & Column name

Create name,age,imagename,image path datatype=nvarchar(50) or (MAX)

Next - Double Click Submit Button

Namespaces Add using System.IO & DataBase Connection

Write the file Upload & Insert Coding Below Like that

Next - Right Click Solution Explorer - Add Empty Folder (files) required name

Next - F5 Click - Run the Program - Browse Button Click - Select Image folder

Upload the selected Folder

Next - Image Added & name & age given - submit Button

Image & name & age inserted
two or three image insert alternately

Next - Want to bind the gridview inserted Images - Add Gridview - Right click - Select Edit Column- Remove Auto generate fields
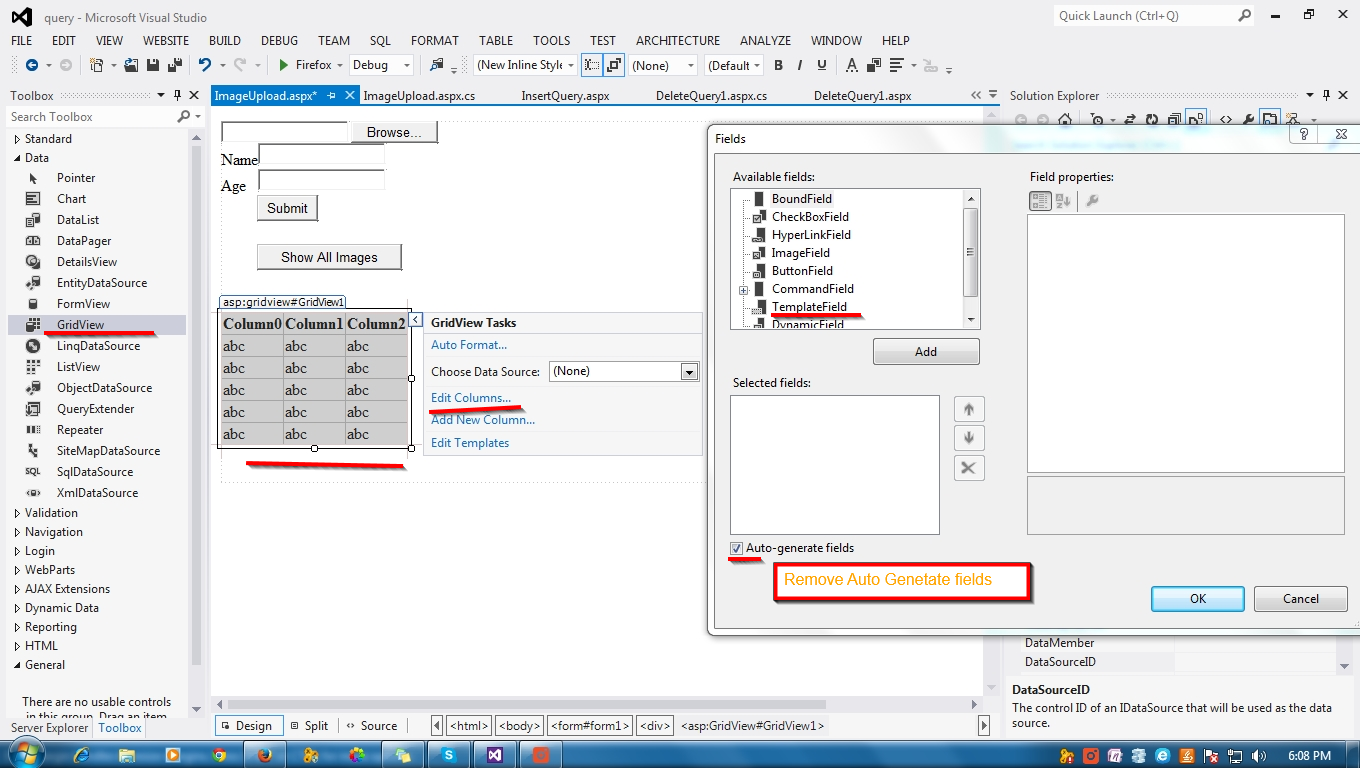
Select - Template Field - Go to Header Text - change the name to your database Field Name(for display only if you want to captial Letter given)

Next - Click OK Button - Go to Design page

GridView Added Column Name

Next - Right Click GridView - Select Edit Template

Select - Column Name from GridView Task - Select Name - Label Add to Item Template

Next - Select Label - Select Edit DataBinding - Given Coding to Database Field Name Eval("fieldname")

Select - Column Name from GridView Task - Select Age - Label add to Item Template
Next - Select Label - Select Edit DataBinding - Given Coding to Database Field Name Eval("fieldname")

Select - Column Name from GridView Task - Select imagename - Label add to Item Template
Select - Image from ToolBox to Item Template - Select - Edit Binding- Add imagepath name Eval("imagepath")
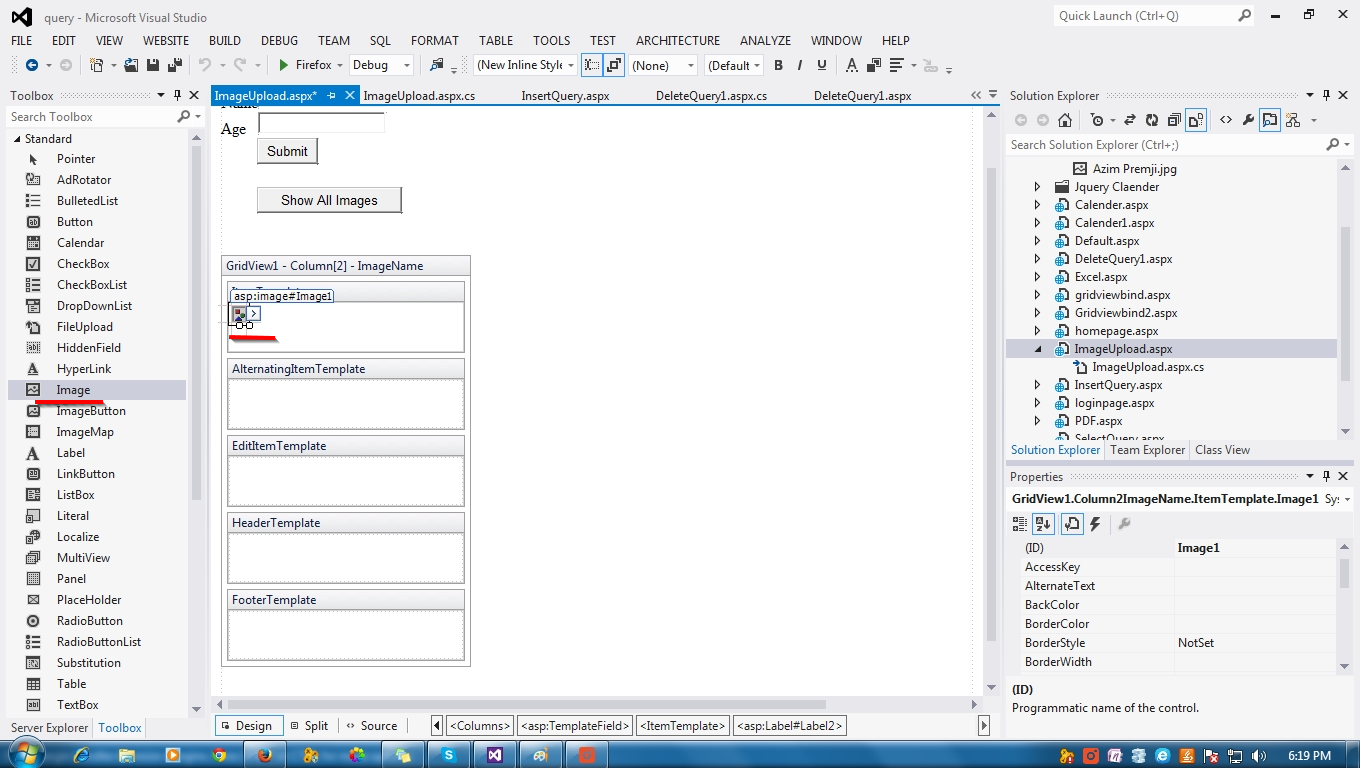
From your DataBase Field

Next - Click - End Template Editing - Go to Design Page

GridView bind all Fields

Html Coding For Gridview Binding

Next - Select Show all images Button Double Click

Select Query Coding to Bind data to GridView

OUTPUT
Next - F5 Click - Run the Program - Click the Show All Image Button Gridview Display Name & age & Image ( I have inserted only 3 images )
Image Upload And Bind The Gridview After Inserted Images Using Asp.Net C#.
Multiple Image Upload
Image Update in Gridview
Show Image Preview
Restrict Upload File Size
Image Insert Bind GridView
Without Database Upload Image Show
DEMO
HTML Coding
<html xmlns="http://www.w3.org/1999/xhtml">
<head id="Head1" runat="server">
<title>Save Images In Folder and Display Images in Gridview from folder</title>
</head>
<body>
<form id="form1" runat="server">
<div>
<asp:FileUpload ID="FileUpload1" runat="server" />
<table><tr><td class="auto-style1"></td></tr>
<tr><td> <asp:Label ID="Label1" runat="server" Text="Name"></asp:Label>
</td><td> <asp:TextBox ID="txtName" runat="server"></asp:TextBox>
</td></tr>
<tr><td ><asp:Label ID="Label4" runat="server" Text="Age"></asp:Label>
</td><td><asp:TextBox ID="txtAge" runat="server"></asp:TextBox></td></tr>
<tr><td ><asp:Button ID="btnSubmit"
runat="server" Text="Submit" onclick="btnSubmit_Click" />
</td></tr>
<asp:Button ID="Button1"
runat="server" OnClick="Button1_Click1" Text="Show All Images" />
<asp:GridView ID="GridView1"
runat="server" AutoGenerateColumns="False">
<Columns>
<asp:TemplateField HeaderText="Name">
<ItemTemplate>
<asp:Label ID="Label2" runat="server"
Text='<%# Eval("name") %>'></asp:Label>
</ItemTemplate>
</asp:TemplateField>
<asp:TemplateField HeaderText="Age">
<ItemTemplate>
<asp:Label ID="Label3" runat="server"
Text='<%# Eval("age") %>'></asp:Label>
</ItemTemplate>
</asp:TemplateField>
<asp:TemplateField HeaderText="ImageName">
<ItemTemplate>
<asp:Image ID="Image1" runat="server"
ImageUrl='<%# Eval("imagepath") %>' />
</ItemTemplate>
</asp:TemplateField>
</Columns>
</asp:GridView>
</table>
</div>
</form>
</body>
</html>
Image Upload & insert
NameSpace
using System.IO
protected void btnSubmit_Click(object sender, EventArgs e)
{
if (FileUpload1.PostedFile != null)
{
name=Path.GetFileName(FileUpload1.PostedFile.FileName);
FileUpload1.SaveAs(Server.MapPath("files/" + name));
SqlCommand cmd = new SqlCommand
("insert into upload(name,age,imagename,imagepath)values('" +txtName.Text + "','" + txtAge.Text + "','" + name + "','" + "files/" + name + "')", con);
cmd.ExecuteNonQuery();
con.Close();
Response.Write("<script>alert ('Data Inserted')</script>");
}
}
Gridview Bind All Table Values (Select query)
protected void Button1_Click1(object sender, EventArgs e)
{
dbcon();
query = "select * from upload";
cmd = new SqlCommand(query, con);
adp = new SqlDataAdapter(cmd);
ds = new DataSet();
adp.Fill(ds);
GridView1.DataSource = ds;
GridView1.DataBind();
}
First - Select New WebForm - Add file Upload Tool From Toolbox & Label & Textboxes - Change the Textbox Id name
Next - Create Table & Column name
Create name,age,imagename,image path datatype=nvarchar(50) or (MAX)
Next - Double Click Submit Button
Namespaces Add using System.IO & DataBase Connection
Write the file Upload & Insert Coding Below Like that
Next - Right Click Solution Explorer - Add Empty Folder (files) required name
Next - F5 Click - Run the Program - Browse Button Click - Select Image folder
Upload the selected Folder
Next - Image Added & name & age given - submit Button
Image & name & age inserted
two or three image insert alternately
Next - Want to bind the gridview inserted Images - Add Gridview - Right click - Select Edit Column- Remove Auto generate fields
Select - Template Field - Go to Header Text - change the name to your database Field Name(for display only if you want to captial Letter given)
Next - Click OK Button - Go to Design page
GridView Added Column Name
Next - Right Click GridView - Select Edit Template
Select - Column Name from GridView Task - Select Name - Label Add to Item Template
Next - Select Label - Select Edit DataBinding - Given Coding to Database Field Name Eval("fieldname")
Select - Column Name from GridView Task - Select Age - Label add to Item Template
Next - Select Label - Select Edit DataBinding - Given Coding to Database Field Name Eval("fieldname")
Select - Column Name from GridView Task - Select imagename - Label add to Item Template
Select - Image from ToolBox to Item Template - Select - Edit Binding- Add imagepath name Eval("imagepath")
From your DataBase Field
Next - Click - End Template Editing - Go to Design Page
GridView bind all Fields
Html Coding For Gridview Binding
Next - Select Show all images Button Double Click
Select Query Coding to Bind data to GridView
OUTPUT
Next - F5 Click - Run the Program - Click the Show All Image Button Gridview Display Name & age & Image ( I have inserted only 3 images )


.gif)


Keep in touch! I'll update this blog article informative is excellent.I like that's our blog.
ReplyDeleteSelenium Training in Chennai
Selenium Training in Velachery
It is Very nice and Informative website.Excellent Work
ReplyDeleteSelenium Training in chennai | Selenium Training in annanagar | Selenium Training in omr | Selenium Training in porur | Selenium Training in tambaram | Selenium Training in velachery
Informative post indeed, I’ve being in and out reading posts regularly and I see alot of engaging people sharing things and majority of the shared information is very valuable and so, here’s my fine read.
ReplyDeleteweb designing training in chennai
web designing training in tambaram
digital marketing training in chennai
digital marketing training in tambaram
rpa training in chennai
rpa training in tambaram
tally training in chennai
tally training in tambaram
Great post. Wonderful information and really very much useful. Thanks for sharing and keep updating.
ReplyDeletedata science training in chennai
data science training in annanagar
android training in chennai
android training in annanagar
devops training in chennai
devops training in annanagar
artificial intelligence training in chennai
artificial intelligence training in annanagar
Excellent Blog! I would like to thank for the efforts you have made in writing this post. I am hoping the same best work from you in the future as well. I wanted to thank you for this websites!
ReplyDeletehadoop training in chennai
hadoop training in omr
salesforce training in chennai
salesforce training in omr
c and c plus plus course in chennai
c and c plus plus course in omr
machine learning training in chennai
machine learning training in omr